The Bunnings Workshop community can help with your home improvement projects.
- Bunnings Workshop
- >
- Discussion
- >
- Outdoor
- >
- Re: Planning outdoor area - Ideas
Three-tier deck and pergola
- Subscribe to RSS Feed
- Mark Topic as New
- Mark Topic as Read
- Float this Topic for Current User
- Bookmark
- Subscribe
- Mute
- Printer Friendly Page
- Mark as New
- Bookmark
- Subscribe
- Mute
- Subscribe to RSS Feed
- Highlight
- Report Inappropriate Content
Three-tier deck and pergola

I'm busy planning my deck and pergola. This is what I'm thinking at the moment.
I thought the 3 layer deck would be nice (total deck length is 9m, pergola length is 6m, highest deck is 35cm above ground).
I was thinking of using the lowest deck to put a lounger couch on, but not sure it takes up too much space. Also, not sure the planter box along that deck makes sense either? It's around 45-50cm wide.
In the designs, I've staggered down the planter boxes. The deck is 3m wide at the top, and 3.15m wide in the lower part (from house brick to planters).
The part without deck goes off into our garden.
Fence is colourbond 2m above ground (so 1.7m above the higher deck).
I also have no idea where to put the BBQ or if I should build in a BBQ area, or simply use a portable to make the space bigger.
(I can add some screens without plants if that helps).
Here's some designs
Would love your thoughts.
Regards
Itai
Community manager's note: Check out How to build a low-level deck for expert advice.
- Labels:
-
Barbecue
-
Decking and Paving
-
Landscaping
- Mark as New
- Bookmark
- Subscribe
- Mute
- Subscribe to RSS Feed
- Highlight
- Report Inappropriate Content
Re: Planning outdoor area - Ideas
Hello @Itai,
What an impressive build! This is by far is one of the most well thought out and meticulously planned decks I've seen built here on workshop. Thank you so much for sharing the photos and steps you took in building this deck. The extra measures you've taken to protect your deck will surely pay off in the long run. What an absolute pleasure to see it come together. I'm sure a lot of our members will be keen to ask you about the details of your build.
We look forward to seeing more, please keep us updated.
Eric
- Mark as New
- Bookmark
- Subscribe
- Mute
- Subscribe to RSS Feed
- Highlight
- Report Inappropriate Content
Re: Planning outdoor area - Ideas
Loving your progeas with this ! Execution is on point 👍🏽
Regards
Rufaro
Yours Kindly. For more, please follow @diy_hausdesigns
- Mark as New
- Bookmark
- Subscribe
- Mute
- Subscribe to RSS Feed
- Highlight
- Report Inappropriate Content
Three Tier Deck and Pergola
Hey all.
So I've finally completed all 3 tiers, just without the side panels yet. Below are my progress shots.
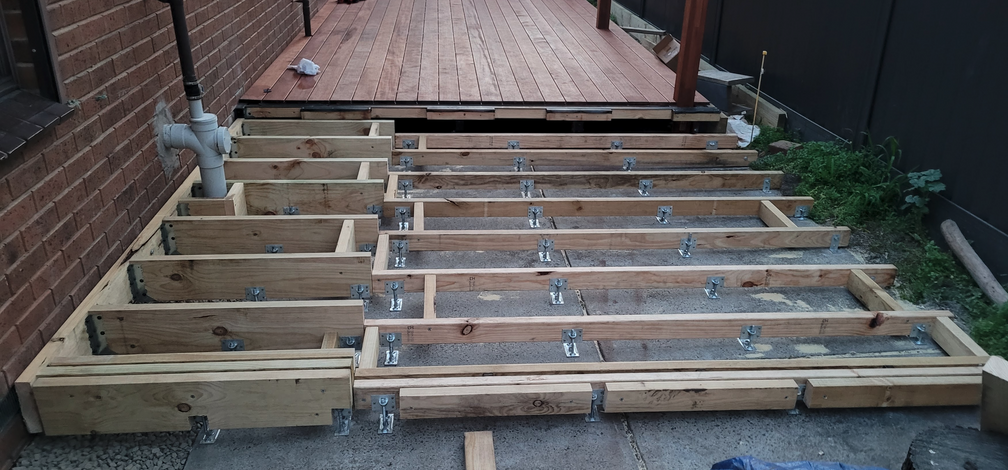
I must say, the lowest tier turned out to be much harder than I thought, even with the klevaklip system (maybe even because of it, lol!) ... mainly because my concrete had some weird slopes, and while the slope is down and to the right, it wasn't consistent. I levelled it a good few times with a long steel square tube and level, before eventually giving up on that approach and borrowing my neighbours laser level ... and I must say, it's the next best thing since sliced bread!
The mid tier was much easier as I just attached the wood to the ledger which was levelled, and because it was 190mm wood (for height control, not for structural reasons), there was no bend in the short lengths, so it was just really easy to level.
I also bit the bullet and bought the plunge saw, to straighten and align the boards on the main deck and lower deck. I really do wish I bought that at the beginning of my renovation last year. Though I've only made a few cuts, it's been so easy to get precise accurate cuts. My only gripe with the Ozito plunge saw is that when you put the 2 tracks together, they're unaligned like a 1mm or so, which means I can't get a perfect long straight cut. It is only a 1mm or so. But I'm a perfectionist!
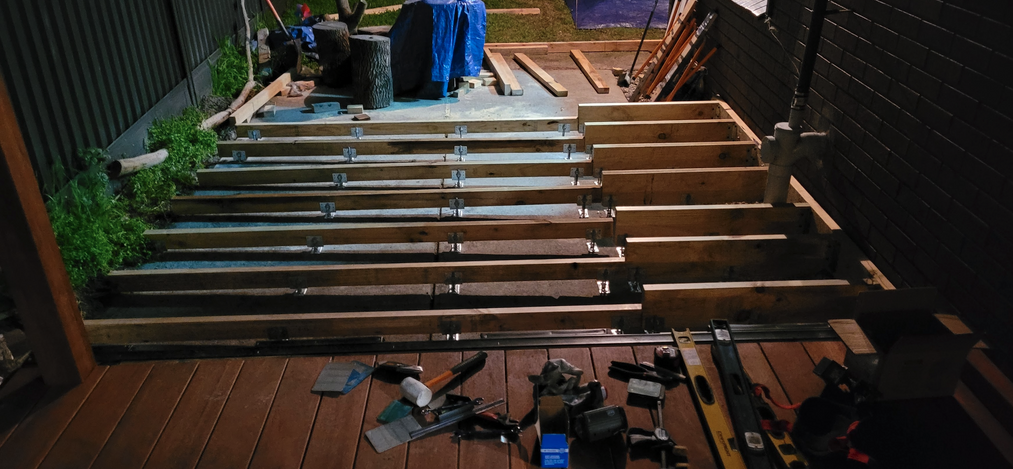
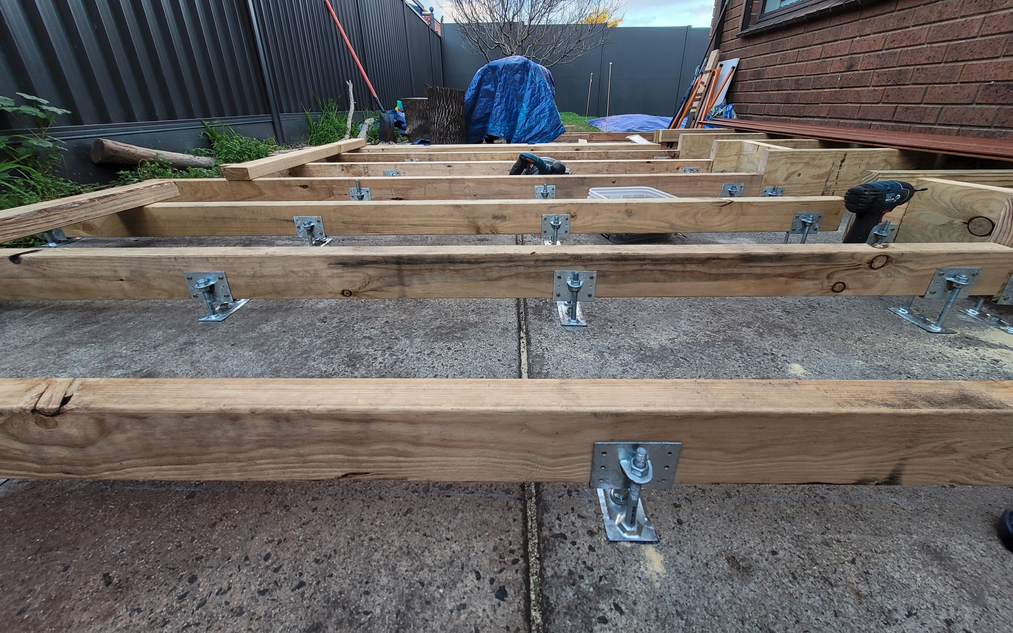
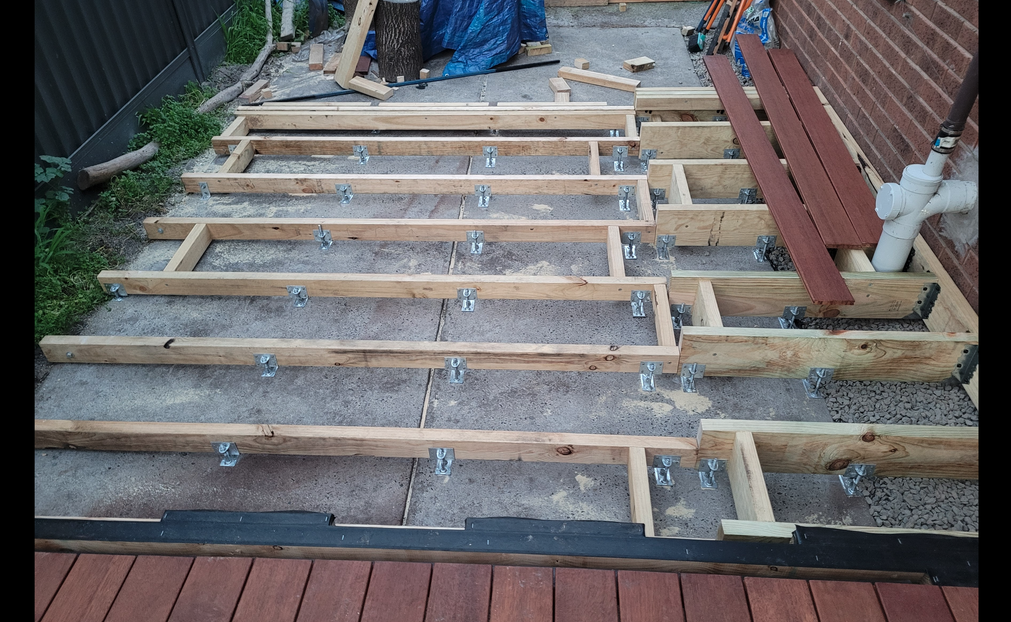
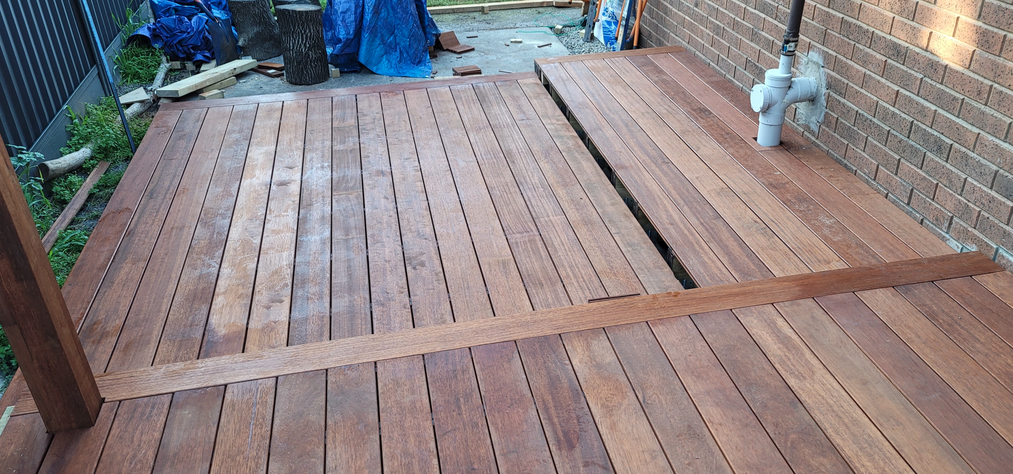
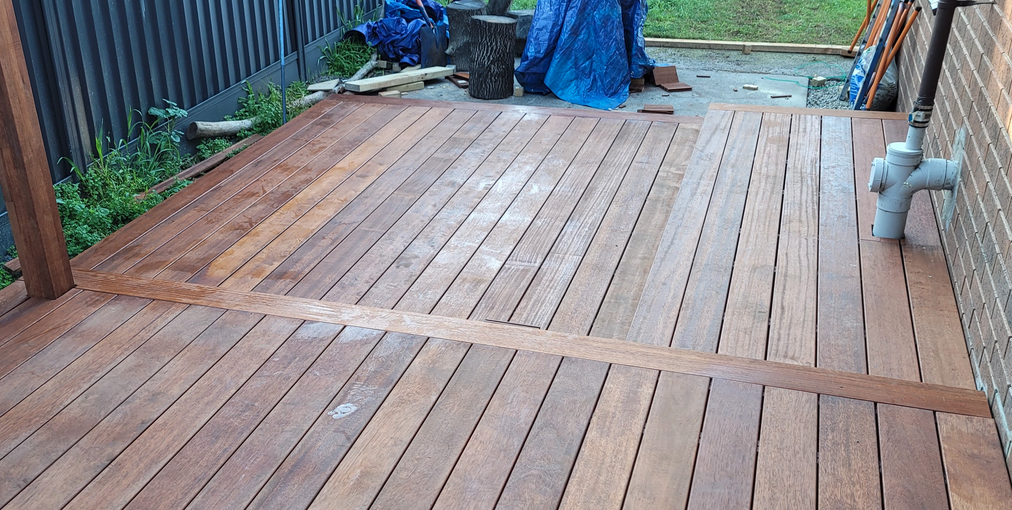
Here are the progress photos of the lower tiers.
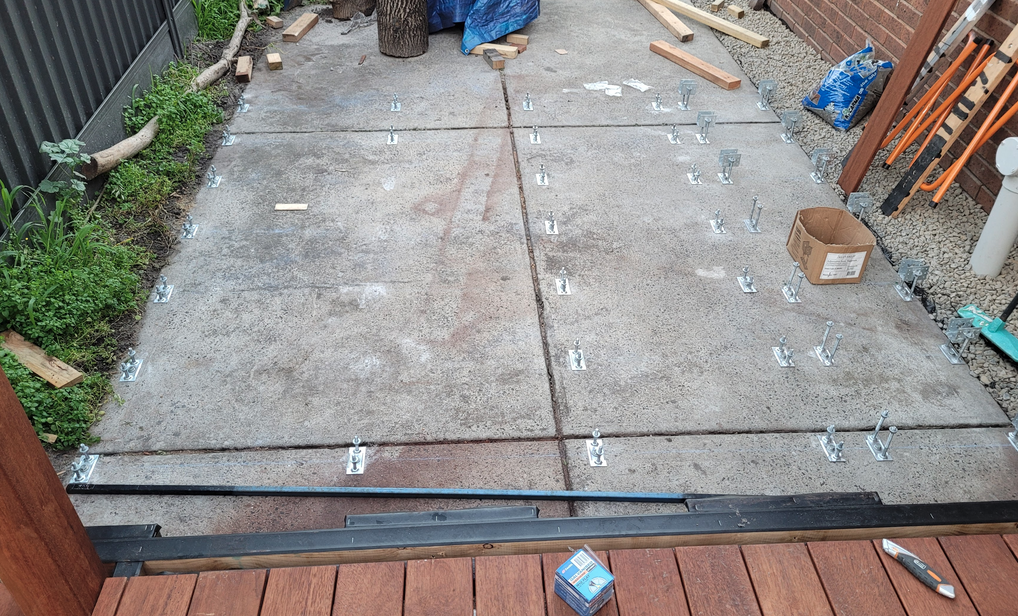
Installing the Klevaklip system.
You'll see a few missing in the second row from the right. That's because I ran out. But as it turned out, the ones on the left, the slope was actually too high for some of the middle ones (uneven slope), so I ended up using 5mm thick angle brackets for those ones, and moved them into the 2nd row. The angle brackets were actually much sturdier, but less easy to level if I were to use them instead across the board. Another thing, is individually the klevaklips felt quite flimsy because the bolts would wobble a little in their seats. However, when all the wood was installed and everything tightened, the flimsiness disappeared. As you will see below, I did also put noggins in between most of the floor joists. I only skipped where I used an angle bracket as it just wasn't necessary.
I also made 2 errors which cost me a lot of time. The first, I just assumed all the lower deck's brackets needed 60mm bolts. This was very far off. Only 2 or 3 of the brackets needed them. So I had to undo all the brackets to remove them, and then I had to buy all sorts of different sized bolts, as if they were too short, the nut wouldn't be able to screw on (or I couldn't get the bracket high enough at all), and if they were too long the bolt would have been higher than the top of joist and get in the way of the decking board. Thankfully, Bunnings has a great return policy, so I bought a whole bunch of bolts in stepping up sizes (60mm, 75mm, 100mm, 110mm, 120mm) and returned what I didn't use. Amazing that the slope ended up being, that the lowest corner of the deck, I had to attached the bracket directly to the concrete without any bolts, and the highest corner I am using a 120mm bolt (around 65mm difference). Which is quite a slope over 4.2m (corner to corner diagonally).
The second mistake was that I measured everything out based on the lowest corner, assuming the joist would touch the bottom of the bracket, and levelled the entire deck to that. Then I installed the first joist, and it wasn't level and I was very very confused, so I levelled that first joist. And then the rest of the deck wasn't level to it, so literally spent hours trying to figure out what was going on, why I was so off, and relevelling everything (and ended up getting that laser from my neighbour). Once I had all the joists level, and was stumped because my maths was around 10-15mm off, I realised it was because I attached the first bracket to the ground directly, which meant the bolt head was above the bottom of the bracket line and I had needed to use a drill spade bit to create a recess in the wood for it. The instructions do say to do this, but I just forgot. I was super annoyed. But decided to stick with it ... I wasn't prepared to spend another day or two of disconnecting and relevelling everything again. At the end of the day, no one will notice and neither will I. I just means a bit more work for the side panels, which will be easy now with the plunge saw!
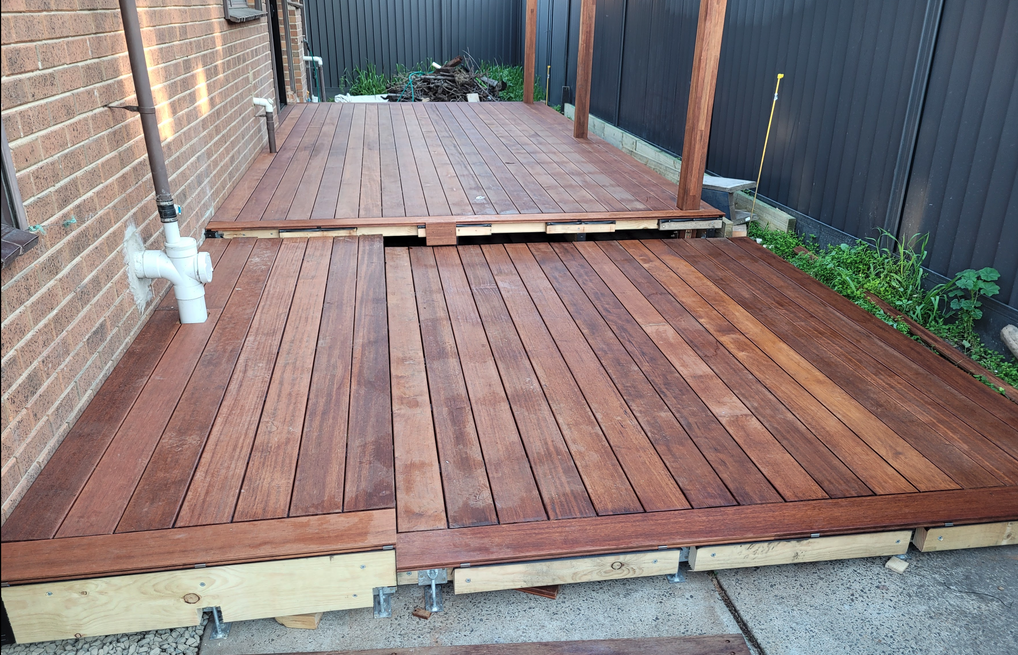
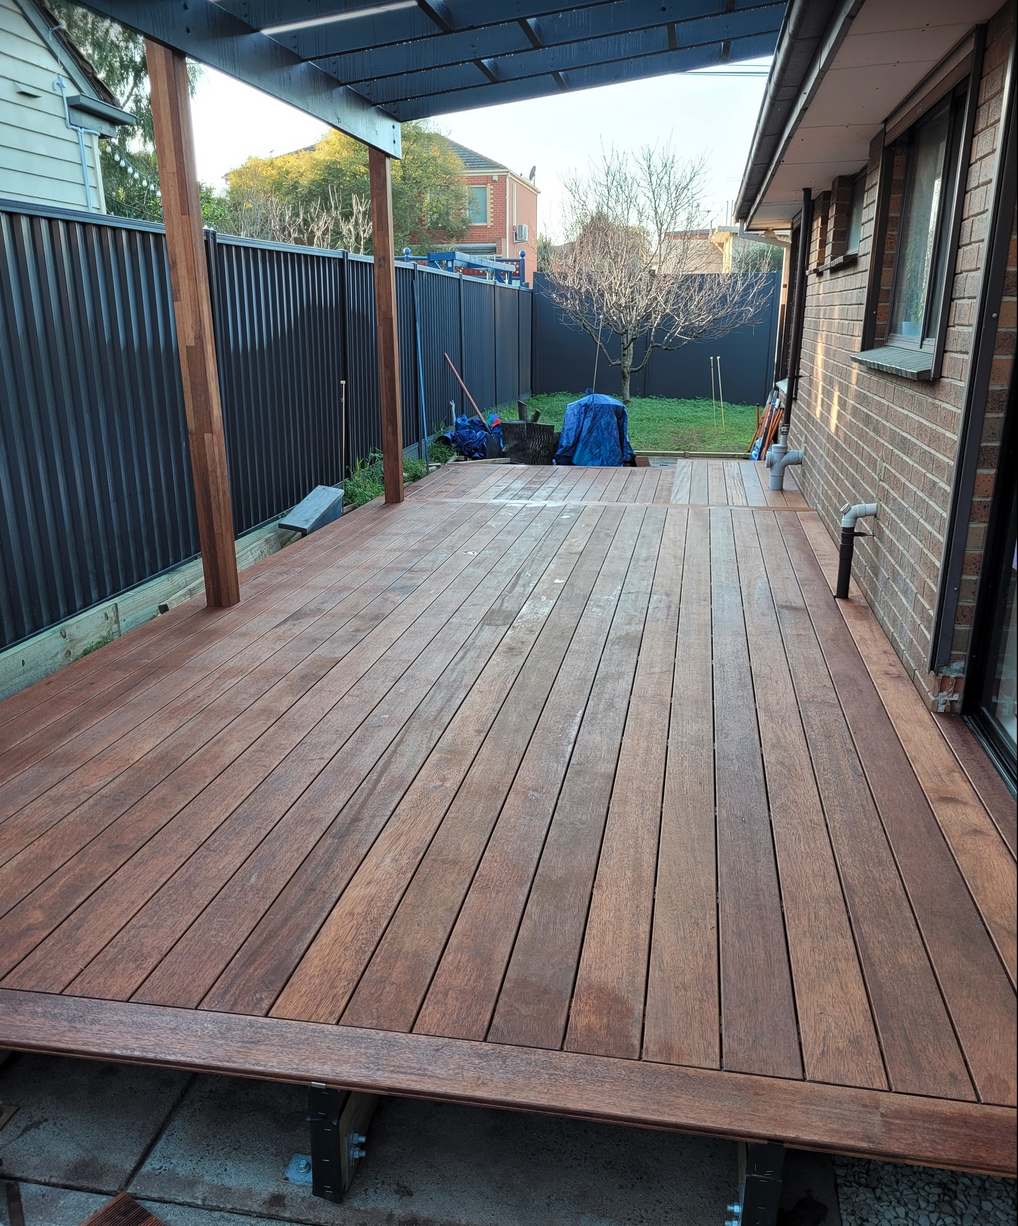
All finished (except the side covering)
Next steps in order:
- Finish the side panelling
- Add lighting to the side panelling between tiers - I'll be usingsmart RGB-W LED striplights in diffused chanels
- Build the raised garden bed for the main deck level
- Decide what to do and build the area between deck and fence for the lower level (I'd like to incorporate a water feature here, so am doing a bunch of research. The space is only between 32 - 39cm wide).
Fill the concrete section between the deck and garden with a sand or gravel or something for a firepit area.
- Install the EZ-glaze roofing (This is last because stock is only available in December. I will be using a clear plastic tarp in the meantime and hoping it doesn't rip in wind!)
Things to decide still:
- Do I make a built in BBQ area, or simply use a BBQ cart
- Do I put a screen up on the laundry side of the deck
- What sort of lighting we want
- Any other things I should do.
I'll likely only get to these next steps in the next 3-4 weeks as I've got a few other projects and occasions that will take precedence in the mean time, but should get back to it in August.
Regards
Itai
- Mark as New
- Bookmark
- Subscribe
- Mute
- Subscribe to RSS Feed
- Highlight
- Report Inappropriate Content
Re: Planning outdoor area - Ideas
Hello @Itai
Thank you so much for that update on your decking project. I suggest a BBQ cart to allow you to find the best spot when cooking. Building a fixed BBQ area limits your choice of location. With a BBQ cart, you can move your cooking facilities to a better spot, especially when the wind and rain are very strong.
Are you looking for a bright light source or something festive like Lytworx Warm White Connectable Double Filament LED Party Lights - 10 Pack? I have this set at home and they are so easy to join together. They provide more than enough light during those late-night get-togethers.
We look forward to seeing more once you've finished those last details on your list.
Eric
- Mark as New
- Bookmark
- Subscribe
- Mute
- Subscribe to RSS Feed
- Highlight
- Report Inappropriate Content
Re: Planning outdoor area - Ideas
Hey Eric.
Yeah, that's what I'm thinking too. I love the asthetics of built in barbeques, but it does limit space. Also, means more time before you can begin to use the area!
In terms of lights, thanks for sharing that link. I nabbed 4 packs of something similar from Bunnings on clearance, but I think the ones I grabbed aren't very strong lights. I'll see how they look once I set them up outside, if I need something stronger.
I am planning on putting one or two ceiling fans and two or so roof mounted strip heaters once I get the roof covering, so not sure if the string lights would get in the way? Do you know if strip heaters are any good in this kind of space where there is a roof, but no wall on 3 sides?
Thanks
Itai
- Mark as New
- Bookmark
- Subscribe
- Mute
- Subscribe to RSS Feed
- Highlight
- Report Inappropriate Content
Re: Planning outdoor area - Ideas
Hello @Itai
The strip heaters are actually quite good but are limited by their stationary application. I recommend the Jumbuck Charcoal Gas Patio Outdoor Heater. This allows you to move the heat to where it is needed most. It has an estimated coverage of at least 17 square meters and has a safety tilt mechanism that shuts it off in case it falls over. It has its own carriage wheels for ease of transfer and movement.
On the high setting, the Patio Heater is estimated to last at least 6 hours on a 9kg gas bottle, on lower settings it will extend it to 10 hours. You can purchase a cover hood when storing it during summer. It should be safe for your lights and fan as long as you observe the recommended distance for items near the heater.
Eric
- Mark as New
- Bookmark
- Subscribe
- Mute
- Subscribe to RSS Feed
- Highlight
- Report Inappropriate Content
Re: Planning outdoor area - Ideas
Hey All.
As mentioned, it's been a long time since I posted an update.
I stopped working on the deck to focus on my daughters new cubby, which took longer than expected (bought the cubby, but kitted it out).The deck is 99% done.
Here's the final photo (Without plants, etc and please excuse the massive mess of weeds in the back, that's next ... just waiting on some pins for weedmat):
You can see the white LED channel under the side panel of the first tier.
What have I done since the last update:
- Finish the side panelling
- Added LED strips to the side panelling of the first tier
- Built the raised garden bed for the main deck level
- Decided the area between the lower deck and fence, instead of being a fancy screening, will just be some good old climbing fence plants, like Lilly Pilly or something (Garden stuff TBD later).
Things to do:
- Fill the concrete section between the deck and garden with a sand or gravel or something for a firepit area.
- Install the EZ-glaze roofing (Still waiting for Stock, ETA Dec. My plastic tarp ripped off in the crazy windows in August, which was expected but I was just hoping it'd take longer!)
Other things decided:
- Not going to do a built in BBQ, instead I'll use a portable one and I'll build a wooden patio card for it with two wheels ( @EricL @MitchellMc Any good links for how to build a nice patio cart for a BBQ?)
- For now I will not put screen up the Laundry side of the deck. Longer term plan is to put an office shed there, and it would be great if it opens directly onto the deck or something like that. And holes can't be unmade.
Side note:
For the light strips, I only did the main step down for now, I wasn't happy with the 45 degree channel as it left the gap between the bottom deck boards and end exposed, so I've ordered a new square tube channel as I want to hide the gap between the channel and the bottom decking boards better. So I will wait for that to arrive before I cut the lower decks side paneling.
Pro-tip: The Ozito Plunge Track Saw is amazing for cutting these decking boards precisely. I shaved off 5mm so precisely, that I have a perfect strip of 5mm decking board I can use to hide small gaps, like a quarter round, but flat.
And some in-progress shots:
I had to brace the sleepers in the middle of the 6m garden bed because there was just too much play. There's still some play at the 1.5m points on either side, but I felt it wasn't enbough to warrant concern, especially as most of the force of the soil is downward, and there's a deck and fence posts to keep it all in. I have added little bits of wood here and there to keep the individual boards aligned in the centre, and also used 300mm landscape screws through the tops ... which are damn hard to drive in that last part of the way, even with a Bosch Professional Driver ... I had to use a ratched for the last part usually ... painful work!
Used some pond liner to line the raised garden bed for a few reasons:
1. Reduce the time of decay of the sleepers.
2. Prevent moisture and sand from faling through the gaps where the wood isn't perfectly flush
Those notches on the right of the photo are additional pieces of sleeper attached with 4 Bugle screws each to provide enough space to attach bolt-down screening (Screen up or similar) if I choose to do so in future.
In the process of installing the LED strips, I accidentally broke one cable, got a replacement part and crimping tool on order ![]()
I'll post a photo of the light once I fix the cable.
THe last photos in this series will be circa Dec / Jan once I get the EZ-glaze roofing, and maybe the plants.
Regards
Itai
- Mark as New
- Bookmark
- Subscribe
- Mute
- Subscribe to RSS Feed
- Highlight
- Report Inappropriate Content
Re: Planning outdoor area - Ideas
What an amazing amount you have accomplished @Itai. Everything is looking splendid!
We don't have a guide on building a timber bbq cart, but they are generally similar to a potting bench. Our step-by-step guide on How to build a D.I.Y. potting bench should head you in the right direction. You might also like to check out @GeoffB's BBQ cocktail trolley and @DesRigby's BBQ workbench.
Pity about the LED strips cable connector. Did the crimp snap, or did the crimped section pull out of the socket? The socket looks like it can be opened, and you'd possibly be able to solder the crimped section back together.
I can't wait for the next instalment as I trust the finished project will look sensational.
Mitchell
- Mark as New
- Bookmark
- Subscribe
- Mute
- Subscribe to RSS Feed
- Highlight
- Report Inappropriate Content
Re: Planning outdoor area - Ideas
Thanks @MitchellMc That DIY Potting bench video should come in useful!
On the crimp, I had to take the individual wires out of the connector to fit it through a hole. And when I squeezed them all through, the one crimp broke. Not really possible to solder them back together and leave the mechanism sound. It's cheap enough to get the crimps. Just takes time to get them in from china as I couldn't find them locally.
- Mark as New
- Bookmark
- Subscribe
- Mute
- Subscribe to RSS Feed
- Highlight
- Report Inappropriate Content
Re: Planning outdoor area - Ideas
Hi Everyone.
Just thought I'd put in the final instalment. I've finally finished the deck and pergola area (with the exception of 1 last LED strip light under the tier, and lighting electrics which I'll complete over the break and get an electrician for next year). But for day time use it's complete. Roofing went in this past week, was really easy to install ... did it all in about 2-3 hours.
For the last part of the ground at the end of the deck. I used a mixed brown river stones that I got from the local lanscape supplier. I also used these stone to continue along the concrete bath that runs along the other side of the house beyond the photo, so it brings it all together. And just used these to hold the stones in place: https://www.bunnings.com.au/tuscan-path-100cm-garden-edge-ez-landscape-edge_p3321731 which I bolted to the concrete with Anka screws. I also put some steel right angles that I got free as protective packaging for my fence to go under the deck and stop the stones from going under the deck. Around the cubby, I used playground mulch from the local lanscaper as well. Though I'm regretting it a bit as it blends in too much with the stone for my liking. In time, I will top it up with a darker natural coloured mulch.
Here's the final photos.


And that officially concludes this post ![]()
Regards
Itai
Why join the Bunnings Workshop community?
Workshop is a friendly place to learn, get ideas and find inspiration for your home improvement projects
You might also like
We would love to help with your project.
Join the Bunnings Workshop community today to ask questions and get advice.


