The Bunnings Workshop community can help with your home improvement projects.
- Bunnings Workshop
- >
- Discussion
- >
- Outdoor
- >
- Re: Outdoor Power suggestions
Outdoor Power suggestions
- Subscribe to RSS Feed
- Mark Topic as New
- Mark Topic as Read
- Float this Topic for Current User
- Bookmark
- Subscribe
- Mute
- Printer Friendly Page
- Mark as New
- Bookmark
- Subscribe
- Mute
- Subscribe to RSS Feed
- Highlight
- Report Inappropriate Content
Outdoor Power suggestions
Hey Workshoppers,
I have an old smallish shed which we are tearing down. It has power for lights, and 2x 240v outlets. It used to house the swimming pool pump on a timer, as well as tools, table, cupboards for pool chemicals etc, and a bar fridge.
There's conduit running from the house to the shed, it goes up one of the walls on the outside of the shed.
We intend to use the cement floor, so just the shed is going. We can extend the cement slab into a pergola or just outside eating area.
We have an electrician in the family, so we are ok with disconnection of the wiring etc..
I'd like to keep "some" of the conduit or replace it, and put a weather proof power outlet there. I thinking of putting a small box on a pedestal, so it's above future water issues (we had a minor flood during the last downpour, but the water never got above 2 inches, and we are on a slope anyway.
A nice "weatherstation" type box (with slats, white painted wood) might look attractive.
Thoughts?, any gotchas, and advice?
- Mark as New
- Bookmark
- Subscribe
- Mute
- Subscribe to RSS Feed
- Highlight
- Report Inappropriate Content
Re: Outdoor Power suggestions
That sounds like a great project, @Walter.
It would be reasonably easy to create an attractive-looking enclosure to house your weatherproof powerpoint. You might need to route the frame of the unit to accept the slats. I would imagine creating a jig would be the best approach allowing you to repeat the same identical cut for all the slats. I've thrown together a render of an option, and it looks like it would be a great weekend project. Were there any particular designs you had in mind?
Let me mention @redracer01 to see if here had some ideas.
Mitchell


- Mark as New
- Bookmark
- Subscribe
- Mute
- Subscribe to RSS Feed
- Highlight
- Report Inappropriate Content
Re: Outdoor Power suggestions
Something like that is pretty much what I had in mind.
I'm not good with power tools, LOL, so something like that would have to be ready made, or I could get one of my friends to do it as a project.
- Mark as New
- Bookmark
- Subscribe
- Mute
- Subscribe to RSS Feed
- Highlight
- Report Inappropriate Content
Re: Outdoor Power suggestions
Hello @Walter
Welcome to Bunnings Workshop. If there was ever a time to try your hand at DIY now's the time! This project can be made in many ways and does not have to look like the stuff we draw here. It all boils down to planning and preparation if you have the time then this particular DIY project should be a great starter project for you. Plus it is a great excuse to buy tools and build up your experience in using them. Below is my suggestion for your weather station pretty close to @MitchellMc 's suggestion I just opted for the gabled roof. You can make this more practical by attaching shelves to the post and putting potted plants on them to make it more attractive. Enjoy the drawing and ponder the possibilities! Oh and if you do build it make sure to put mozzie mesh inside to make sure you don't get any uninvited guests. It also makes a great hiding spot for the spare key!
Cheers,
Red
I am a Bunnings team member. Any opinions or recommendations shared here are my own and do not necessarily represent those of Bunnings. Visit the Bunnings website for assistance from the customer service team.
- Mark as New
- Bookmark
- Subscribe
- Mute
- Subscribe to RSS Feed
- Highlight
- Report Inappropriate Content
Re: Outdoor Power suggestions
Excellent ideas there. I never thought of the fly screen mesh, nor shelves. That might be a good thing.
I have some tools, but I'm by no means an expert, and If I were to try to make it with a jig etc, I guarantee it will be a mess.
Now, give me a 3D Printer, and I'm a an expert at design and printing. A 'puter has a better eye to hand coordination than me, and it's unlikely to bleed if it slips.😂
As it progresses, I'll update.
- Mark as New
- Bookmark
- Subscribe
- Mute
- Subscribe to RSS Feed
- Highlight
- Report Inappropriate Content
Re: Outdoor Power suggestions
Update.
Thanks heaps for the design and suggestions.
Well, We've put it up and tested it.
As originally told, I wanted to use the old power conduit from the old shed. So, that's fine.
I had a mate do the woodwork, my Brother in Law do the electronics (he's the certified sparky).
We put the assembly together today. We decided to add a light to the fixture, which is coming soon, since we have a light conduit
My part of the project for this, which I have mostly completed, is an Arduino based weather station, which will be WiFi connected and report Temp, Humidity, Pressure, Rainfail and (stretch goals) Air Quality and Lightning), and make it available online to anyone via WeatherUnderground.
Right now, it's powered via the normal 240volts with a 9V adaptor, and not fully setup, but I plan on adding a Solar Panel and a chargeable battery so it's independent of the powerpoints.
Many thanks to @redracer01 and @MitchellMc for the design ideas, as you can see we have combined the suggestions.
More updates as we get it finished.
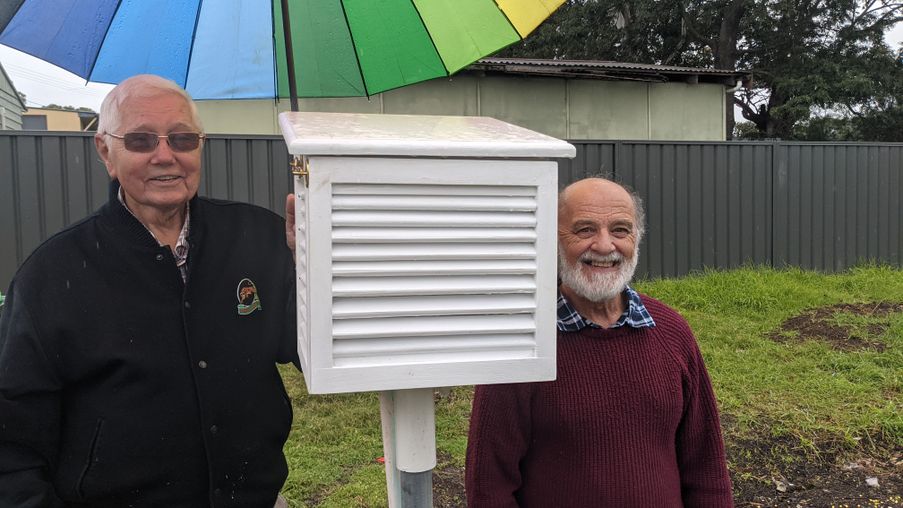
Electrician and carpenter ( the real workers)
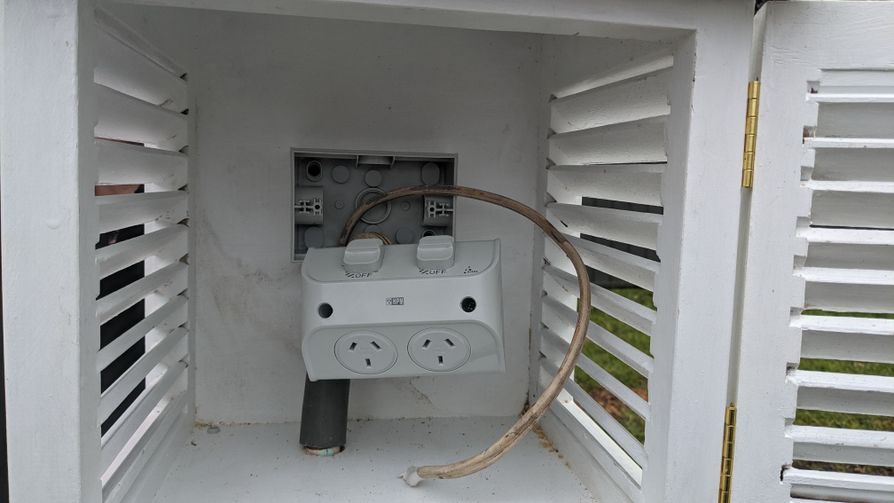
Internals before connection
- Mark as New
- Bookmark
- Subscribe
- Mute
- Subscribe to RSS Feed
- Highlight
- Report Inappropriate Content
Re: Outdoor Power suggestions
That looks fantastic, @Walter! I can't wait to see it all set up with the weather station installed.
Many thanks for the update.
Mitchell
- Mark as New
- Bookmark
- Subscribe
- Mute
- Subscribe to RSS Feed
- Highlight
- Report Inappropriate Content
Re: Outdoor Power suggestions
Hey all.
I started this project with a friend who is a carpenter, a relative who is an electrician, and myself, who does 3D printing and microelectronics.
The idea was to keep the power from the old shed, and give me outside power, and also a weather station in an attractive garden fixture.
After building the structure, and setting up the power, time to work on the project.
There were a few projects that others had done, and I wanted something that would be comprehensive, expandable and genuinely useful and stretch my brain a bit.
I settled on a Diyode article DIY Solar Powered WiFi Weather Station because while I had power there, I wanted to make my first solar powered circuit.
The original Solar Powered WiFi Weather Station is just brilliant and has an active community helping, and writing code (sorry about mentioning coding - it's part of what I do.🤣)
You can buy the windvane and anemometer from Mouser or other places I chose the Sparkfun module, since the community was using it, and it was the fastest to ship to me.
I added a few different sensors than the original, just more sensitive, and I want lower power consumption if I can get the project working longer on a single solar battery charge.
Anyone with a small amount of soldering skills can do this, and simply copy the code from the community, BTW.
I 3D printed a circuit board mount, but it's not really necessary - it just looks neater, and I can remove the circuit board to reprogram the modules as I improve things.
Internal before connecting it all up. The plug on the right is currently connected to a "fridge lamp" which gives off a nice look in the evening If I turn it on. Note the sockets are weather proof.
To mount the anemometer, rain gauge and solar panel we drilled a hole in the back of the box, fed the cables through, and used silicon sealant to weather proof it.
Some stirrup clamps, wooden chocks, and a rubber stopper keep it all perfectly vertical and solid.
So I wrote some new code, not perfect yet, and not finished, and it's publicly available.
My internet feed for the weather station is Here and I also have a ThingView app feed to my android phone:
The coding to make a wind direction compass is quite complex I've found, and a bit beyond me at the moment, so I'll have to stick with the current gauge that thingiverse supplies until I can understand the code.
Future developments will include additional sensors for UV readings, air quality and anything else I can drive. I'm also going to put in an additional solar panel and light sensor to drive an attractive LED light instead of the "fridge light"
Why join the Bunnings Workshop community?
Workshop is a friendly place to learn, get ideas and find inspiration for your home improvement projects
You might also like
We would love to help with your project.
Join the Bunnings Workshop community today to ask questions and get advice.


