- Subscribe to RSS Feed
- Mark Topic as New
- Mark Topic as Read
- Float this Topic for Current User
- Bookmark
- Subscribe
- Mute
- Printer Friendly Page
Share
- Mark as New
- Bookmark
- Subscribe
- Mute
- Subscribe to RSS Feed
- Highlight
- Report Inappropriate Content
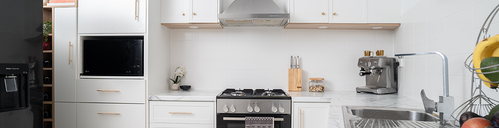
 Reclaimed White Cypress feature beams replacing the original wall, and compliment the freshly polished floorboards. With Laminex Surround scallop panelling, in Dulux Olive Blend, used for the feature wall and island bench, and Dulux Renovation Range painted kitchen cabinetry in Nicks Nook
The original layout was very closed off so we always wanted to remove the dividing wall and bring some "wow" to the united space. Using reclaimed local timbers and new feature products we chose to go with earthier green tones and brass fittings to best compliment the lighter finished timber and keep a feeling of warmth. With a new breakfast bar island bench and also incorporating various lighting options including LED strip under all the kitchen cabinetry to reflect off the brass kicks.
Materials
Tools
Laminex Surround in Scallop 45
Fluted satin finish white tiles 600x300
Brass tapware and fittings
White Cypress beams
Hafele Impact benchtops
Dulux renovation range paint
Brass kicks
Threaded rod
LED strip lighting with aluminium extrusion
Plasterboard
Cornice
Westinghouse free standing electric stove
Westinghouse rangehood
Ozito Planer Thicknesser
Makita belt sander
Makita orbital sander
AEG 18v Power Tool Kit (https://www.bunnings.com.au/aeg-18v-9-piece-fusion-brushless-5-0ah-force-kit_p0468504)
Tiling and plastering trowels and hand tools
Painting equipment - rollers, brushes, etc
Steps
Step 1
1/6First the original wall had to go. Which started by removing all the cladding, skirting boards and cornices.


Step 2
2/6After removing the existing wall using props to hold the ceiling/roof up the beams went in to take its place. The upright beam was utilised to support the span being in 2 pieces, and also to anchor the island bench and provide a location to place another above-bench power outlet.

Step 3
3/6Once the support was in place it was time to remove what was left of the still "semi-usable" kitchen and re-sheet the internal walls.


Step 4
4/6After the floor was polished the cabinetry could start to go in. Apart from 1 Kaboodle blind corner cabinet all the cabinetry came from a second hand kitchen we purchased a year earlier.


Step 5
5/6Next came bench tops, tiling and feature panels


Step 6
6/6And finally all the finishing touches - hanging all the cabinetry panels, putting the hardware on, the sink in, connecting up plumbing, and installing all the strip lighting


- Mark as New
- Bookmark
- Subscribe
- Mute
- Subscribe to RSS Feed
- Highlight
- Report Inappropriate Content
Re: "Green and Gold Dream" - Remodelled kitchen and living area
Hi @katzie01,
Thank you for sharing this fantastic kitchen renovation project.
What a fantastically unique kitchen space you've created. I love the cabinetry and the bold colour choices.
I had a good chuckle at your colour test on the dividing wall before it was removed. This was a great way to see the colour in the space without needing to commit to the choice.
Your colour choices accompanied by the beautiful post and beam, coved feature wall, freshly polished flooring and under-cabinet lighting make for a fantastic space to cook and spend time with your family.
Congratulations on a wonderful project.
Jacob
Why join the Bunnings Workshop community?
Workshop is a friendly place to learn, get ideas and find inspiration for your home improvement projects
| Subject | Author | Posted | |
|---|---|---|---|
| August 2023 | |||
| February | |||
| June 2023 | |||
| August 2023 | |||
| July 2021 |