The Bunnings Workshop community can help with your home improvement projects.
- Bunnings Workshop
- >
- Discussion
- >
- Garage and Shed
- >
- Re: No frills Red Oak tool cabinet
No frills Red Oak tool cabinet
- Subscribe to RSS Feed
- Mark Topic as New
- Mark Topic as Read
- Float this Topic for Current User
- Bookmark
- Subscribe
- Mute
- Printer Friendly Page
- Mark as New
- Bookmark
- Subscribe
- Mute
- Subscribe to RSS Feed
- Highlight
- Report Inappropriate Content
No frills Red Oak tool cabinet
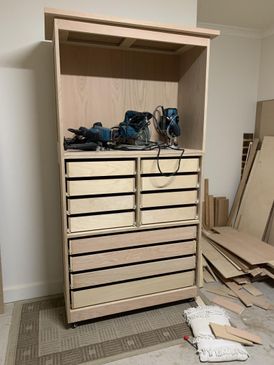
Here's the tool cabinet I made a while ago. I wanted something simple, mobile and could be split into two parts if I ever moved house. The materials used are veneered red oak ply from Bunnings, birch ply, solid red oak (Bunnings) for the doors and all the edge banding was done using iron on white oak. All joinery is tongue & groove / dowels.


If theres enough interest I'll upload the construction.
- Mark as New
- Bookmark
- Subscribe
- Mute
- Subscribe to RSS Feed
- Highlight
- Report Inappropriate Content
Re: No frills Red Oak tool cabinet
Hello @PeakyBlinder71
Thank you very much for sharing pictures of your Oak tool cabinet project. The craftsmanship on the finish is superb, it looks like it has no frills, but the cabinet is professionally finished. The drawer gaps are all in alignment and the joins on the doors are excellent. Did you put in some sort of locking mechanism for the two cabinets when joined together?
Any other information you can share about the cabinet's assembly would be highly appreciated.
Again, thank you for sharing your beautiful Oak tool cabinet project.
Eric
- Mark as New
- Bookmark
- Subscribe
- Mute
- Subscribe to RSS Feed
- Highlight
- Report Inappropriate Content
Re: No frills Red Oak tool cabinet
Hi Eric,
Thanks for the kind comments mate. The two parts are just screwed into each other, I don't suspect there will be much wear as I wont be moving that much ![]()
I like the 18mm solid red oak project panels Bunnings are stocking now, it saves me having to mill the boards myself. Do you know if they can get any white oak or maybe even walnut/Jarrah?.
edit: I'll try and post my construction photo's this evening ![]()
- Mark as New
- Bookmark
- Subscribe
- Mute
- Subscribe to RSS Feed
- Highlight
- Report Inappropriate Content
Re: No frills Red Oak tool cabinet
Thank you very much for answering my question. I'm sure our members will find that extra bit of detail quite handy.
We look forward to seeing your construction photos.
Eric
- Mark as New
- Bookmark
- Subscribe
- Mute
- Subscribe to RSS Feed
- Highlight
- Report Inappropriate Content
Re: No frills Red Oak tool cabinet
So I started out with a plan using sketchup, I wanted something simple, mobile and could be split into two parts if I ever moved house. The materials used are veneered red oak ply, birch ply, solid red oak for the doors and all the edge banding was done using iron on white oak.
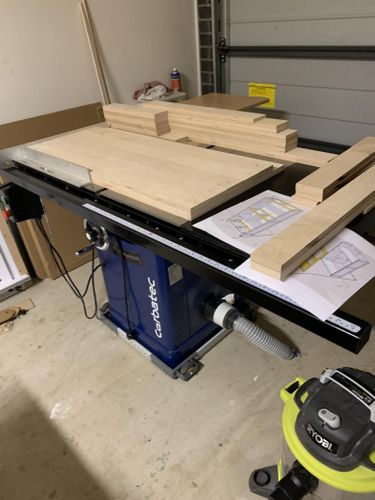
Sketchup Plan....
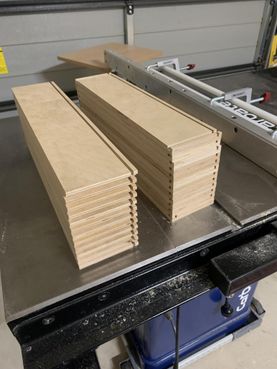
Some of the plywood cut to size...

The base complete. Eventually a strip of veneered red oak will be glued to the front to hide the screws.

The back panel & mid support glue up, using dowel joinery. The most accurate doweling jig is one you make yourself, I've tried many and they're all not accurate enough for me.

Here's my doweling jig...
The supports, back's & base all complete.
.
Veneered red oak glue up to hide the front base screws.
After assembling the carcass I went ahead and started gluing the rails and stiles to the sides which hid all the scews!, I left a few mils around the edge so I could flush trim them using the router.

Carcass complete & checked for squareness!.
The top and wheels added.
Close up of some of the veneer.
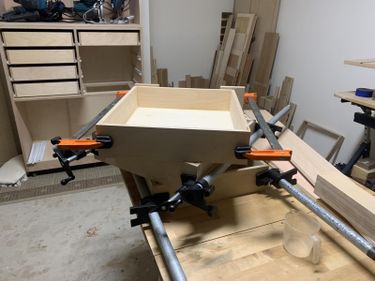
The drawers were constructed using tongue & groove, everything went together pretty well however at this point I started to get tennis elbow!, something I've never suffered with until now!.I was going to make my own runners but opted to buy some cheap ones for the small drawers and some soft close for the bottoms.
Attaching the veneered plywood fronts.

Door assembly using solid red oak for the rail & stiles. I've never worked with red oak before &
suddenly realised during cutting the stuff, it has a very distinct smell that I can't quite put my finger on!.

Shellac time!. 3 coats of the hard stuff, lovely.... dry's quick, and you can cut it back to whatever sheen you want!, you just can't beat the traditional finishes. I cut the sheen back using 0000 steel wool to create a nice even satin finish which still shows the grain, just how I wanted it!. I also added a little dark oak tint to the first coat of shellac to make the grain pop abit more...
- Mark as New
- Bookmark
- Subscribe
- Mute
- Subscribe to RSS Feed
- Highlight
- Report Inappropriate Content
Re: No frills Red Oak tool cabinet
Thank you very much for posting those construction photos. Those panels are so precisely cut and the shellac coating is amazing. It's so wonderful seeing it all come together piece by piece. I'm sure our members will find this cabinet assembly truly inspirational.
Eric
- Mark as New
- Bookmark
- Subscribe
- Mute
- Subscribe to RSS Feed
- Highlight
- Report Inappropriate Content
Re: No frills Red Oak tool cabinet
This looks absolutely amazing! I am very impressed with this and your joinery.
I love the drawer pulls which has space for labels. How long did it take for you to construct this cabinet? I can see a lot of planning went into this project.
I was thinking of doing something similar in my garage. I too was thinking of building a cabinet which can partially disassemble if/when I need to move house. Your post has inspired me. Thanks!
- Mark as New
- Bookmark
- Subscribe
- Mute
- Subscribe to RSS Feed
- Highlight
- Report Inappropriate Content
Re: No frills Red Oak tool cabinet
@PeakyBlinder71 bookmarking this for when I finally have a property with a garage!! Super practical, but also absolutely stunning.
- Mark as New
- Bookmark
- Subscribe
- Mute
- Subscribe to RSS Feed
- Highlight
- Report Inappropriate Content
Re: No frills Red Oak tool cabinet
Hello @DIYScientist
Let me tag @PeakyBlinder71 to make them aware of your very kind words. I totally agree the tool cabinet is a master class in timber joinery. The care and precision with which this cabinet was assembled are truly outstanding. The overall finish is just superb, I can see it providing many years of service.
When the time comes for you to build your tool cabinet, please keep us updated. I'm sure our members would be keen to see your version of the tool cabinet.
Eric
- Mark as New
- Bookmark
- Subscribe
- Mute
- Subscribe to RSS Feed
- Highlight
- Report Inappropriate Content
Re: No frills Red Oak tool cabinet
@DIYScientist Hi, Thanks for your kind comments. The plan originally started out as a drawing, then I transferred the idea to a 3D rendering program (sketchup). From start to finish I think it took about 3 months on and off. The drawer pulls I got off Amazon. For small garages and if you rent its a good idea to keep everything mobile by putting wheels on everything.
Why join the Bunnings Workshop community?
Workshop is a friendly place to learn, get ideas and find inspiration for your home improvement projects
You might also like
We would love to help with your project.
Join the Bunnings Workshop community today to ask questions and get advice.


