
The Bunnings Workshop community can help with your home improvement projects.
- Bunnings Workshop
- >
- Discussion
- >
- Outdoor
- >
- Re: Alfresco feature ceiling panelling
Alfresco feature ceiling panelling
- Subscribe to RSS Feed
- Mark Topic as New
- Mark Topic as Read
- Float this Topic for Current User
- Bookmark
- Subscribe
- Mute
- Printer Friendly Page
Share
- Mark as New
- Bookmark
- Subscribe
- Mute
- Subscribe to RSS Feed
- Highlight
- Report Inappropriate Content
Alfresco feature ceiling panelling

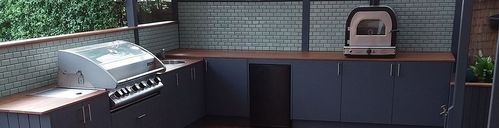
A friend of mine wanted a ceiling for his Alfresco area to finish and hide the rood frame. I saw these new wall panels at Bunnings and it gave me an idea...
Materials
Prempanel 2700 x 600 Oak Acoustic Panels
90mm x 35mm M10 pine
Otter 50mm 14G black button head screws
Custom U-channel flashing
Tools
Tape measure
Drill & 2mm pilot bit
Impact driver
String line
Steps
Step 1
Step 1: Measure and mark out the centre line of 2700mm x 600mm within the roof space. Using a string line helps with this.
Step 2
Step 2: Cut and fix the 90 x 35 pine as battens to the existing roof frame to that the feature panels will fit half-way on each batten. This allows for the next panel to the side or end can be fixed. I used a frame cut but you could use 75mm batten screws through pore-drilled 6mm holes


Step 3
Step 3: I used off-cut of the pine and made offset blocks that I clamped to the battens. These were used to support the panels while they were being fixed in place by the black button head screws.
The black spacing between the timber panels is actually a sound-check material that compresses. so screws can easily be over-driven, hence using flat button heads. When driving the screws, you need to use your fingers to hold open wider the timber slats so the button heads can clear the edges and stop damage.
The panels are very flexible so having a platform ladder and a step ladder with two people are required, though I did manage to do this on my own. Not my first choice!

Step 4
Step 4: There will be cutting required, both end and by length. The straight edge clamped to the cutting line and a fine toothed blade was used on a circular saw. Taping the cutting line with blue painters tape will reduce any splintering. This was performed on a couple of saw horses.
Step 5
Step 5: as this product is internal and I had the edges of the panels exposed to the weather, I had made up at the local plumbing supplies 26mm (ID) x 15mm U shaped colourbond Chanel that I trimmed and fitted to all edges wand fixed with silicone.
Step 6
Step 6: I installed solar LED string lights (not seen in the photos) through every 2nd black Channel.
- Mark as New
- Bookmark
- Subscribe
- Mute
- Subscribe to RSS Feed
- Highlight
- Report Inappropriate Content
Re: Alfresco feature ceiling panelling
Well, that is certainly the bee's knees @Nailbag! I love that. Such a sleek look that adds interest to the space yet isn't over the top.
I'm sure your friend was very impressed with the results.
Well done, and many thanks for sharing.
Mitchell
- Mark as New
- Bookmark
- Subscribe
- Mute
- Subscribe to RSS Feed
- Highlight
- Report Inappropriate Content
Re: Alfresco feature ceiling panelling
Thanks very much mate and yes he was. But now has started a list of other projects for me 😩
- Mark as New
- Bookmark
- Subscribe
- Mute
- Subscribe to RSS Feed
- Highlight
- Report Inappropriate Content
Re: Alfresco feature ceiling panelling
- Mark as New
- Bookmark
- Subscribe
- Mute
- Subscribe to RSS Feed
- Highlight
- Report Inappropriate Content
Re: Alfresco feature ceiling panelling
Haha thanks very much Jacob
- Mark as New
- Bookmark
- Subscribe
- Mute
- Subscribe to RSS Feed
- Highlight
- Report Inappropriate Content
Re: Alfresco feature ceiling panelling
Looks fantastic @Nailbag. May I ask how they're holding up? I want to do something similar, particularly for the acoustic qualities of reducing reverberation, but I would have assumed these things would soak up moisture?
- Mark as New
- Bookmark
- Subscribe
- Mute
- Subscribe to RSS Feed
- Highlight
- Report Inappropriate Content
Re: Alfresco feature ceiling panelling
Hi @minklet
I was there a few weeks back and are actually doing very well with no signs of swelling which was my main concern. The flashing I had made up which was very difficult to install plus additional silicone appears to be doing the job. I used a "U" channel on all ends. It's really important to install as many flat headed screws within the recessed black material as the panels aren't made to sustain. their own weight. And they are definitely not intended for outdoor environments.
My son installed the panels on his TV wall mainly for aesthetics, but it actually has deadened the room noticeably as the floor covering is timber.
Nailbag
- Mark as New
- Bookmark
- Subscribe
- Mute
- Subscribe to RSS Feed
- Highlight
- Report Inappropriate Content
Re: Alfresco feature ceiling panelling
Great info, thanks very much
- Mark as New
- Bookmark
- Subscribe
- Mute
- Subscribe to RSS Feed
- Highlight
- Report Inappropriate Content
Re: Alfresco feature ceiling panelling
Hey great work. Looks awesome.
I am looking for lightweight ceiling panel for my flat colourbond patio. Would this panels be too heavy? Any other ceiling lining recommendations?
thanks
- Mark as New
- Bookmark
- Subscribe
- Mute
- Subscribe to RSS Feed
- Highlight
- Report Inappropriate Content
Re: Alfresco feature ceiling panelling
Hi @MVJ,
A warm welcome to the Bunnings Workshop community, it is wonderful to have you with us.
Allow me to tag @Nailbag so he is notified of your question.
Without seeing the ceiling, it is hard to say, but assuming the framing allows it to be screwed and glued in line with the fixing requirements of the Prempanel Acoustic Panel Installation Guide, then you should be able to use these acoustic panels.
It all comes down to the framing you've got on your patio as every ceiling lining material will have requirements.
If you can upload some photos of the ceiling framing and give us an idea of how far apart the framing is, we can give you some recommendations.
Let me know if you need a hand uploading images. Happy to help if you need it.
Jacob
Why join the Bunnings Workshop community?
Workshop is a friendly place to learn, get ideas and find inspiration for your home improvement projects
You might also like


We would love to help with your project.
Join the Bunnings Workshop community today to ask questions and get advice.