- Subscribe to RSS Feed
- Mark Topic as New
- Mark Topic as Read
- Float this Topic for Current User
- Bookmark
- Subscribe
- Mute
- Printer Friendly Page
- Mark as New
- Bookmark
- Subscribe
- Mute
- Subscribe to RSS Feed
- Highlight
- Report Inappropriate Content
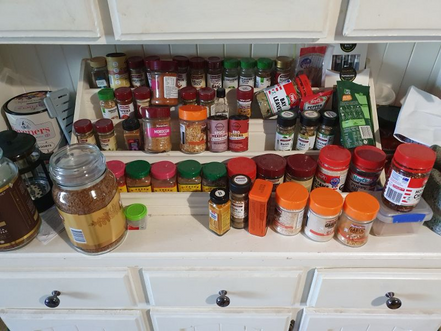
Spice drawer

I had some space available in one of my cupboards, so I decided to make this spices drawer. A lot better than have spices all over the place.
Materials used
1 sheet of 16 mm melamine 1200 mm x 650 mm,
Melamine edging.
1 inch pocket hole screws
2 drawer runners 400 mm long
Re cycled some Tas oak shelves that were no longer required.
Mentholated spirits, to clean pencil marks.


Pocket hole jig for pocket hole screws.

Apply melamine edging, using a heat gun and sanding block to fix to board.


Melamine edging is trimmed using an electric plane blade, then file and sand edges.


Clamp and screw draw using pocket hole screws.


The jars are elevated using tas oak, I had left over timber shelving that fitted perfectly for this project.


- Labels:
-
Organising
-
Tools and Materials
- Mark as New
- Bookmark
- Subscribe
- Mute
- Subscribe to RSS Feed
- Highlight
- Report Inappropriate Content
Re: Spice Drawer
Hi @JoeAzza
Thank you very much for posting your fantastic spice drawer construction steps. I love that the whole thing is put together using a pocket hole jig. The Tassie oak dividers are just awesome and neatly divide the spice bottles position. It's definitely a project worth doing when you consider that this drawer can be assembled with just a single 1200x650 melamine panel.
Thank you for another master class in wood working.
Eric
- Mark as New
- Bookmark
- Subscribe
- Mute
- Subscribe to RSS Feed
- Highlight
- Report Inappropriate Content
Re: Spice Drawer
Ohhhhhh so good Joe !!!!!!!! 😀
- Mark as New
- Bookmark
- Subscribe
- Mute
- Subscribe to RSS Feed
- Highlight
- Report Inappropriate Content
Re: Spice Drawer
Good Morning Joe! @JoeAzza
Lovely woodwork and I admire your ability to keep your spices limited to one drawer - I think that's the way to go. I built a mini-spectator stand to hold our spices, but the temptation to let more spectators in is strong and various bottle sizes make seating arrangements difficult. The result - overcrowding with some heading to the abyss below.

And it's pleasing to see old (>20 years old?) tools still in operation! 👍

- Mark as New
- Bookmark
- Subscribe
- Mute
- Subscribe to RSS Feed
- Highlight
- Report Inappropriate Content
Re: Spice drawer
Well done @JoeAzza. Another terrific project. I'm sure this will inspire many community members.
Jason
- Mark as New
- Bookmark
- Subscribe
- Mute
- Subscribe to RSS Feed
- Highlight
- Report Inappropriate Content
Re: Spice drawer
Hi @JoeAzza,
I kid you not, my husband and I were just discussing how our spices are out of control and we need to make something to get them organised! I'll be bookmarking your fantastic project.
Katie
- Mark as New
- Bookmark
- Subscribe
- Mute
- Subscribe to RSS Feed
- Highlight
- Report Inappropriate Content
Re: Spice drawer
What a creative and fabulous Idea. Passing this onto hubby 😋
- Mark as New
- Bookmark
- Subscribe
- Mute
- Subscribe to RSS Feed
- Highlight
- Report Inappropriate Content
Re: Spice drawer
Welcome to the Bunnings Workshop community @AngelWings. It's marvellous to have you join us, and pleasing you've taken inspiration from this project.
Why pass it on to hubby? That sounds like a perfect way for the project to be put on the backburning! 😂 This project would make a great introduction to woodworking, and with the assistance of our helpful members, I have no doubt that you'd be able to complete this project yourself.
If you were retrofitting an existing drawer, you could cut four lengths each of 40 x 12mm 2.4m DAR Tasmanian Oak Select and 65 x 12mm 2.4m DAR Tasmanian Oak Select to fit the depth of the drawer. Those can be glued and nailed together to form the tiers. Those tiers can then be glued to the base of the drawer with Liquid Nails. I've created a rendering below to illustrate.
Please let us know if you (or your hubby) need any assistance with this project.
Mitchell

Why join the Bunnings Workshop community?
Workshop is a friendly place to learn, get ideas and find inspiration for your home improvement projects


