- Subscribe to RSS Feed
- Mark Topic as New
- Mark Topic as Read
- Float this Topic for Current User
- Bookmark
- Subscribe
- Mute
- Printer Friendly Page
- Mark as New
- Bookmark
- Subscribe
- Mute
- Subscribe to RSS Feed
- Highlight
- Report Inappropriate Content
Full kitchen renovation


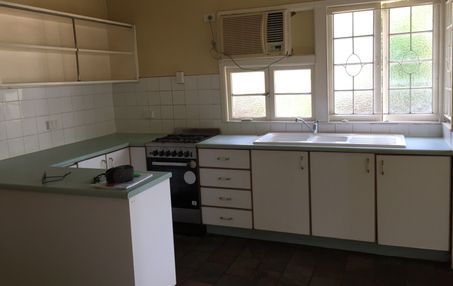
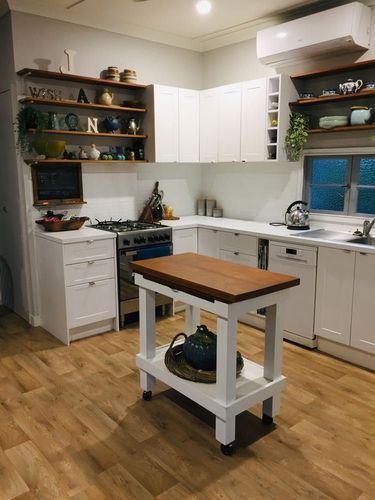
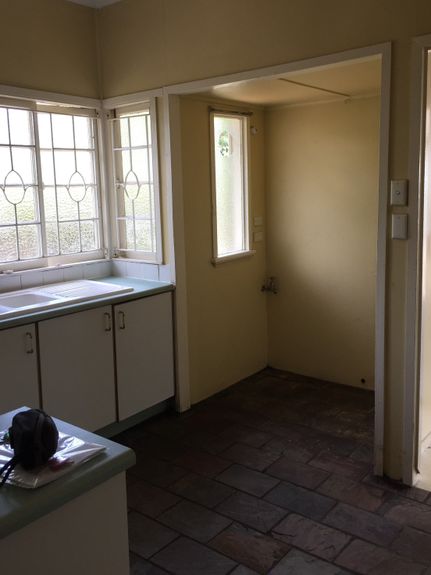
My little lowset Queenslander had been used as a rental for a number of years so was badly in need of some love, but also had to fit into a pretty slim budget. The back kitchen/living area was gutted, with walls removed, (asbestos found!!! that took a huge chunk out of the budget ![]() ), new beams installed, walls insulated and replastered, and new flooring put down. Then the fun part began. Designing the kitchen was like putting a jigsaw puzzle together. I bought the Kaboodle units from Bunnings, assembled them, then rearranged them until I had a workable design. I called in my builder to level and fix them in place, attach the bench and install the sink. I chose Alpine profile with a macaroon finish. The top cupboards I ordered in raw board and painted myself as it was quicker than waiting for the factory finished doors to be available.
), new beams installed, walls insulated and replastered, and new flooring put down. Then the fun part began. Designing the kitchen was like putting a jigsaw puzzle together. I bought the Kaboodle units from Bunnings, assembled them, then rearranged them until I had a workable design. I called in my builder to level and fix them in place, attach the bench and install the sink. I chose Alpine profile with a macaroon finish. The top cupboards I ordered in raw board and painted myself as it was quicker than waiting for the factory finished doors to be available.
The backsplash tiles are basic white subway tiles from Bunnings and the shelves are cut lengths of timber attached to timber brackets, also Bunnings. The walls are painted with Dulux Ice Princess
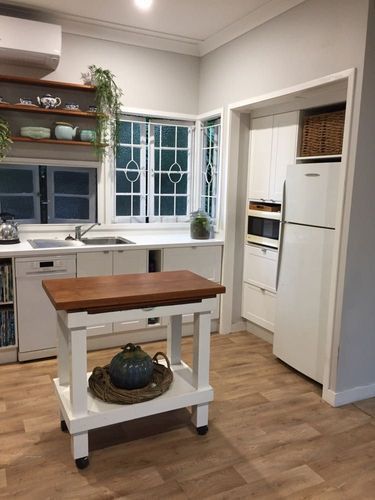
I found a 3/4 dishwasher at Bunnings which fitted in perfectly and voila! I had a kitchen.
The all up kitchen cost, including trades, stove, dishwasher, tiles and taps was approx. $ 8400 and I am thrilled with the result.
- Mark as New
- Bookmark
- Subscribe
- Mute
- Subscribe to RSS Feed
- Highlight
- Report Inappropriate Content
Re: Full kitchen renovation
HI Jan5..
Welcome to the Bunnings Workshop community..
Your project looks very beautifully done and I'm sure many people will want to know more about it..
We wish you every success with your entry..
Prof..
- Mark as New
- Bookmark
- Subscribe
- Mute
- Subscribe to RSS Feed
- Highlight
- Report Inappropriate Content
Re: Full kitchen renovation
A big welcome to the Bunnings Workshop community from me too @Jan5.
You've achieved some sensational results on a budget there and should be very proud of your efforts. I love that you built your cabinetry and moved it around to see what worked. That sounds like something I would do.
Your cabinetry choice is lovely, and the timber's warmth is amazing. The touches of greening really adds some life to your wonderfully stark and clean colour pallet.
Well done, and once again, many thanks for sharing.
Mitchell
- Mark as New
- Bookmark
- Subscribe
- Mute
- Subscribe to RSS Feed
- Highlight
- Report Inappropriate Content
Re: Full kitchen renovation
Thank you for your lovely comments
Jan
- Mark as New
- Bookmark
- Subscribe
- Mute
- Subscribe to RSS Feed
- Highlight
- Report Inappropriate Content
Re: Full kitchen renovation
Thanks Mitchell. It was a fun project.
Jan
- Mark as New
- Bookmark
- Subscribe
- Mute
- Subscribe to RSS Feed
- Highlight
- Report Inappropriate Content
Re: Full kitchen renovation
Morning Jan! @Jan5
Looks beautiful! 😁
Did you make the mobile chopping board?
In that area with the fridge/oven/cupboard - did you keep that frosted window?
Cheers!
- Mark as New
- Bookmark
- Subscribe
- Mute
- Subscribe to RSS Feed
- Highlight
- Report Inappropriate Content
Re: Full kitchen renovation
Thanks for your comments. Unfortunately I had to lose the frosted window in the alcove
so I could fit everything in.
I scored the chopping board thing from a garage sale. Was there at 6am and still had to fight for it
but i pulled my money out first!! It was very orangey so I painted the base and it fitted in well. I may install a permanent
island there in the future but it works really well as it is.
Cheers
- Mark as New
- Bookmark
- Subscribe
- Mute
- Subscribe to RSS Feed
- Highlight
- Report Inappropriate Content
Re: Full kitchen renovation
Hi @Jan5
Allow me to throw in my congratulations on a fantastic new kitchen. It looks wonderful and gives off a beautiful country Hampton feel. That butcher's block frame really draws the eye to the centre of the kitchen. I understand why you had to sacrifice that extra window, I believe it was the only way to make everything fit in your kitchen layout. That new flooring is just outstanding, is it timber panel or vinyl strips?
Thank you so much for sharing your beautiful kitchen renovation.
Eric
- Mark as New
- Bookmark
- Subscribe
- Mute
- Subscribe to RSS Feed
- Highlight
- Report Inappropriate Content
Re: Full kitchen renovation
Thank you so much Eric.
The rest of the house is beautiful polished timber floors but unfortunately the back section of the house was a mismatch of timber, plywood and boards so I had to install a new floor. Would have loved timber but the budget dictated vinyl.
Jan
Why join the Bunnings Workshop community?
Workshop is a friendly place to learn, get ideas and find inspiration for your home improvement projects
| Subject | Author | Posted | |
|---|---|---|---|
| December | |||
| February | |||
| November | |||
| February | |||
| September 2023 |


