- Subscribe to RSS Feed
- Mark Topic as New
- Mark Topic as Read
- Float this Topic for Current User
- Bookmark
- Subscribe
- Mute
- Printer Friendly Page
Share
- Mark as New
- Bookmark
- Subscribe
- Mute
- Subscribe to RSS Feed
- Highlight
- Report Inappropriate Content

*The Father & Son Bar*
INTRODUCTION
My 14yo son recently came home from school and told me that he’s considering a career in Carpentry when he leaves school.
I was never really taught much as a boy and my chosen career path never made up for it. I’m far from a qualified trade and I couldn’t even call myself a DIY’er. As a parent, it’s something I’ve always stressed about; not having any hands-on skills to pass on to my boy. He certainly isn’t getting any younger.
Luckily for me, information nowadays is more accessible than ever. The double-edged sword is that It’s becoming ever increasingly difficult to get the kids of today outside and off of screens. So instead of outsourcing and hiring trades, I figured I’d use this opportunity to tackle putting together the “Man Cave” that we’ve been envisioning for some time. This will be put together inside the shed that is in our backyard.
By using it as a Father & Son project, I hope to try and at least teach him something and bond in the process. I’m sure it will be far from perfect, but I’ll give it a shot. The lesson here is that perfection is impossible, and you don’t know if you don’t try. I’m sure I’ll make mistakes, but those are part of life.
Over the next few months, I’ll be sharing the progress of our project as a bit of a keepsake memento. Something that I can look back on one day. I encourage anyone with any know how to share your advice on any of the stages as we progress, and to tell me if you see me making any fatal errors. No doubt there will be some of you that will receive a call/text to ask a dumb question somewhere along the way.
*A little about the shed*
Footing: Concrete Slab
Construction: Steel Portal Frame, Gable Roof and Colorbond Steel Cladding
Dimensions: 3,160mm (W) x 6,210mm (L)
Wall Height: 2,400mm
Roof Pitch: 20 degrees
Stay tuned.
Materials
Tools
Steps
Step 1
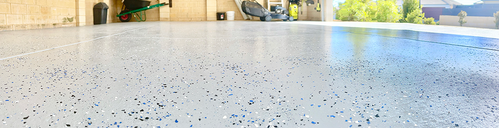
1/2Alex and I kicked off the project last weekend. We started off by giving the slab a good pressure wash on the Friday arvo’. The following morning, we applied a Moisture barrier to the concrete.
We plan to build a false floor over the slab and so a painted or sealed finish wasn't required. We came across a product called “Moisture Proof” (Manufactured by Duracore). By using this product, we avoided the messy and time-consuming process of traditional two part epoxy systems. It also turned out to be very cost effective. The other big benefit being that it is a trafficable surface.
No mixing was required, and a single coat was all that was needed. The product was applied using a low pressure weed sprayer. After 45 minutes, any excess pooling was pushed around with broom. The product is fully dry within 24 hours. The product is designed to penetrate the concrete up to 200mm and forms a non-destructive, 100% colloidal gel. The colloidal gel provides a permanent barrier that withstands hydro static pressure (rising damp); which is all we needed it to do.
Next, we moved onto some painting. Due to the way that we intend to line the walls, part of the frame will remain visible. We started off using a palm sander together with hand sanding. Very quickly realising the job would be much quicker by using a wire wheel on a drill.
The masking wasn’t necessarily required as the adjacent surfaces will be covered. It was mostly about showing Alex the entire painting process. As you can see from the end result, I gave up on the masking by the time the top coat went on 😅.
The frame at the rear will most likely end up being covered. I figured we were already there, and it gives us some flexibility if we change direction later on.
After hitting it all with the sander / wire wheel, it was given a wipe down with solvent. We then applied two coats of primer followed by two coats of topcoat (Colorbond ‘Monument’). The $149 investment in a spray gun was well worth the investment.


Step 2
2/2Step 2: “Rough In”
Before the shed slab was laid, conduit was trenched in with a 20amp supply cable. We’ve just finished installing 3 circuits in the shed. Each circuit has been installed in conduit and affixed to the inside of the wall girts and roof purlins.
-Circuit 1-
-Circuit 2-
-Circuit 3-
School holidays kick in this week. I’ve got a couple more days of work until I go into 3 weeks of leave. Then we can get properly stuck in.
Top Tip: I've since learned that the correct conduit for this install would of been Medium Duty (MD) - They grey stuff. HD is usually only used for underground applications. It is not UV stable. If exposed to sunlight, it will become brittle and crack if impacted. Luckily for me, the conduit will be covered and so it won't be an issue. If the HD was going to be exposed to sunlight, it would need to be painted.
- Cable
Olex 2.5mm Nexans 2 Core And Earth Cable - 1m
Olex 1.5mm Nexans 2 Core And Earth Flat Lighting Cable - 1m - Conduit & Saddles
DETA 25mm Heavy Duty Rigid Conduit - 4m
Deta 20mm Heavy Duty Rigid Conduit - 4m
DETA 25mm x 10m Medium Duty Corrugated Conduit - 25mm
DETA 20mm x 10m Heavy Duty Corrugated Conduit
DETA 25mm Metal Conduit Half Saddle - 50 Trade Pack
DETA 20mm Metal Conduit Mounting Half Saddle - Single Pack
Zenith 10G x 16mm Galvanised Hex Head Metal Screws - 100 Pack
Protek 250ml Type N Clear PVC Cement For Non Pressure Pipes
- Conduit Fittings
DETA 25mm Conduit Coupling
DETA 20mm Conduit Coupling - Single Pack
DETA 25mm Conduit Elbow Bend
DETA 25-20mm Reducer - 2 Pack - 25mm - Distribution Board
Purlmate 3650 Mounting Block
NLS 30329 4 Pole Recessed Mount Distribution Board
Clipsal RCBE220/30S 20amp RCBO 1P N 4.5kA Resi-MAX
Clipsal RCBE21630S 16amp RCBO1P ResiMax
Clipsal RCBE21030S 10amp RCBO 1P ResiMax
Clipsal MCB4-132-32amp Single Pole 4.5kA Circuit Breaker
Tools
Haron 42mm Pipe / Tube Cutter


- Mark as New
- Bookmark
- Subscribe
- Mute
- Subscribe to RSS Feed
- Highlight
- Report Inappropriate Content
Re: The Father & Son Bar - man cave construction project
**New Post**
”Rough In” has been added to Step 2.
- Mark as New
- Bookmark
- Subscribe
- Mute
- Subscribe to RSS Feed
- Highlight
- Report Inappropriate Content
Re: The Father & Son Bar - man cave construction project
Evening @ruredi13
You guys are powering along.... and non intentional pun  But ill take it
Nice tidy work btw.
Dave
- « Previous
-
- 1
- 2
- Next »
Why join the Bunnings Workshop community?
Workshop is a friendly place to learn, get ideas and find inspiration for your home improvement projects