The Bunnings Workshop community can help with your home improvement projects.
- Bunnings Workshop
- >
- Discussion
- >
- Living and Bedroom
- >
- The giant house reno: Home office
The giant house reno: Home office
- Subscribe to RSS Feed
- Mark Topic as New
- Mark Topic as Read
- Float this Topic for Current User
- Bookmark
- Subscribe
- Mute
- Printer Friendly Page
- Mark as New
- Bookmark
- Subscribe
- Mute
- Subscribe to RSS Feed
- Highlight
- Report Inappropriate Content
The giant house reno: Home office
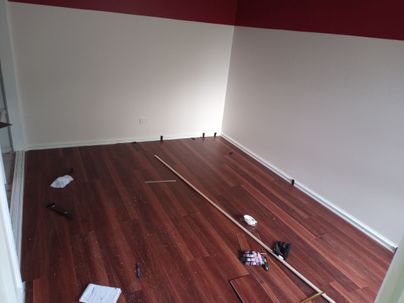
I promised a progress report and here it is! I figured I'm going to have to work room by room, and so I am posting room by room. First up is my home office. Needed to do this first because I need to be able to work while I DIY because of my looking move deadline (and doing this mostly as a one woman show with some help from friends and family when they can). I also neglected taking before still shots so the whole thing starts after the carpet is up and the primer is on. The nicotine stains had made it in here, but not as bad as in the other rooms, so I got away with a coat of British 4 in 1 on the walls and ceiling, and a coat of Taubman's 3 in 1 in T4 for the top third:

I decided I wanted a darker colour in the room because I do a lot of Zoom work and didn't want to blend into the wall, but the room is long with a small window at one end, so went for Taubman's Apple a day on top third, and Irish Cream on the bottom. I also learned a lesson about how steady my hand is on cutting in (and proceeded to buy a trim guide!).

The trims were painted in Bassinet semi-gloss Ultimate Enamel on top of max adhesion primer. The floors are hybrid click lock in Jeremy from timber flooring warehouse. I'd never done anything like this before, so watched A LOT of Youtube... then sort of ended up having to find my own way anyway (but seriously, Jeff on Reality Renovision is a lifesaver). My favorite part is how NONE of the rooms in my house are rectangular and all have a corner missing. I originally used floor leveller to fill the mail holes in the slab, but have since moved to multifill so I don't have to wait 4 days, and the flaws are fairly small.


There is a transition at the door (which is a bronze beaten metal strip) - normally I would have had it all flow through the whole house, but with everything at weird angles and being very new at this, I am transitioning at this door so I can orient the rest of the house to the main room, and at the bedroom which will have boards going perpendicular to these ones. The edges are also a mess, but not too bad for someone using a mitre and rip saw for the first time, and hey, that's what quad and no more gaps are for :p. You'll notice the doorframes are two different colours- I have painted the office side but not the hall side because of the nicotine saga which is ongoing.
The wardrobe doors are yet to be painted and returned, but those aren't urgent. I bought an offcut from a rug place up the road to do the wardrobe floor (the angles are way too sharp and I am going to do entirely built in shelves anyway)/ I have to put in the quad and transition strips. There will be a dado rail between the colours some time after the move, and (eventually) built in desks. Watch this space! For the moment, I have to move my office in there this weekend, and an electrician is coming in tomorrow to install a new power point.
- Labels:
-
Decorating
-
Flooring
-
Painting
-
Renovation
- Mark as New
- Bookmark
- Subscribe
- Mute
- Subscribe to RSS Feed
- Highlight
- Report Inappropriate Content
Re: The Giant House Reno: Home Office
Hi @seannami
Thank you so much for the house update. Those rooms are looking very promising and the floor is looking fantastic. Using a trim guide is truly helpful. It makes painting the cut-ins so much faster. I'm glad that the British 4in1 worked out for you. I hope it was enough to cover the nicotine smells as well.
Please keep us updated with your renovation, we look forward to seeing each room getting finished.
Eric
Why join the Bunnings Workshop community?
Workshop is a friendly place to learn, get ideas and find inspiration for your home improvement projects
We would love to help with your project.
Join the Bunnings Workshop community today to ask questions and get advice.


